
I've been seeing many tutorials on these serving trays. So I thought I would give it a try. My sister supplied me with a slab of wood from her yard.

Supplies Needed:
- Slab of wood
- Color dyes (I used a powdered fabric dye, looking back I would not choose to use these again, instead I would use an acrylic paint which you can get super cheap at Hobby Lobby).
- Leather cord
- 8 oz Easy Cast Epoxy (purchased at Hobby Lobby for $12.99)
- Mixing cups and stirrers (I just used styrofoam and plastic so I could throw away after I was done using)
- Hair dryer
What I started with. Lucky for me, my sister already cut the slab of wood into the right shape and did a bit of sanding.

I did some additional sanding to the top, bottom and sides in a finer grit (120 & 220 grit sand paper).

After sanding, I drilled a hole in the handle using a drill bit. This will allow for the leather cord to be tied to for hanging. I then placed painters tape on the back of the serving tray, in hopes of preventing the epoxy from sticking to the bottom.

I then trimmed off the excess painters tape.

Combine the epoxy (resin) according to the manufacturers directions. Be sure to use different stir sticks each time. After separating the epoxy into different containers, you will mix in the colorant. This is where I would use acrylic paint instead of a powdered fabric dye.

As you can see in the picture, I placed a piece of plastic down on my kitchen table because things are about to get MESSY! I also used two plastic cups to hold the serving board up off the table. You will want to do this because the epoxy is self leveling, meaning it will drip over the edge of your serving board.
After the colorant was stirred. Why I would use acrylic paint instead of powdered fabric dye is because I noticed the powder didn't quite dissolve quick enough. So when I went to pour the epoxy onto the wood, I had granules spread out all over the place. The only color I used acrylic paint for was the white, which went on very smoothly and had full coverage. Another note I would make to myself for a future project would be to use mostly white and use the other colors sparingly.

I began by pouring the white epoxy onto the board. Looking back, I wish I wouldn't have put the epoxy so close to the middle of the serving tray (I should have kept in back towards the handle).

Continue to pour out your colors. There's no rhyme or reason to the technique, just pour them all out there. I had 4 colors total, a red (that ended up looking purple), a dark blue, a light blue and white. Once you pour out all the colors (it's ok if you don't use all the epoxy, you may need some later) use a hair dryer on high heat to spread, swirl and mix the colors. It will create a sort of marbleized look.

Allow the epoxy to spill off over the edge. If the edge becomes too transparent, you can add more epoxy.
Side note: It may be a good idea to wait a little prior to adding more epoxy on your edges because over time, the epoxy will get thicker and stay on a little bit better. I wouldn't wait any longer than 20 minutes to add more epoxy.

I let the epoxy dry for about 2 hours and then pulled off the painters tape from the back. I probably could have waited another hour but I didn't want to push my luck.
After 24 hours you can touch your project, however please note it's not fully cured until after 72 hours. You can see on the back of the serving board where the epoxy spilled over. I went back with my drimmel and sanded this off.

I then used canola oil on the exposed wood. I think you can use any type of cooking oil.
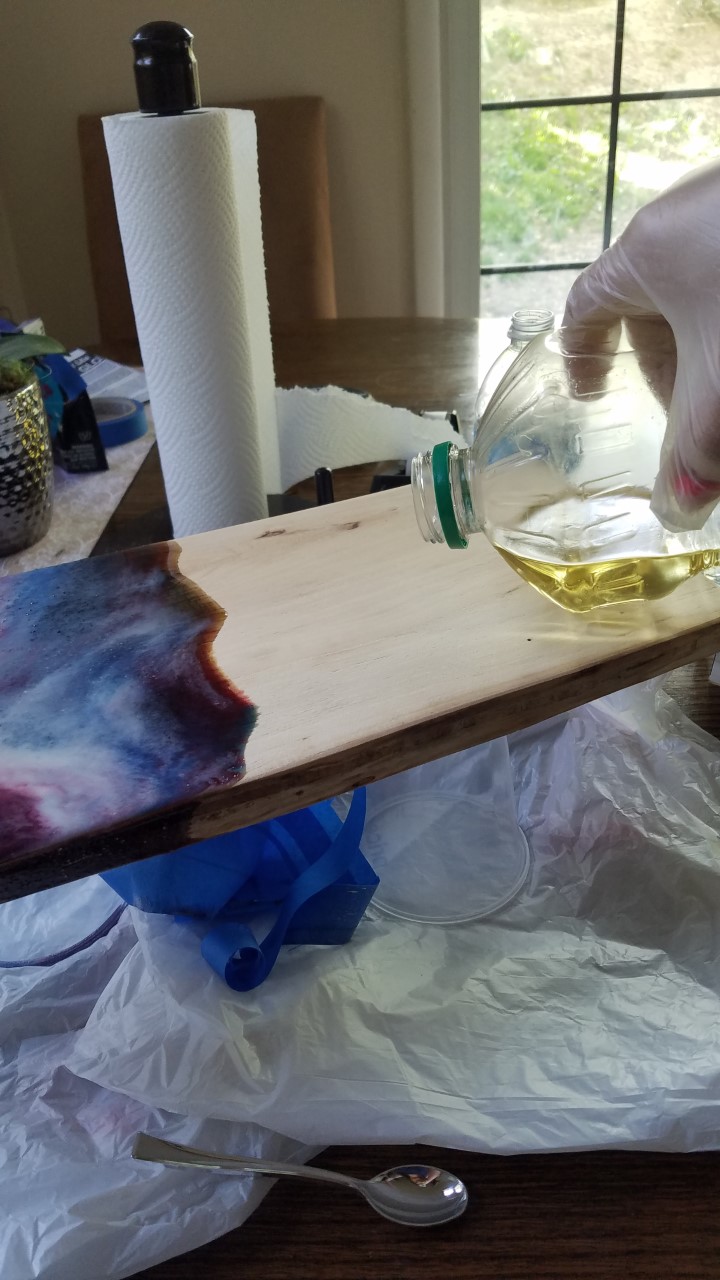
The wood really soaks this stuff up, so much that when you touch it afterwards your hands won't be greasy. I oiled the top, back and sides of the board being careful not to touch the epoxy.

And last touch was to tie on the leather cord so the serving board can be hung for storage purposes.


I paired my serving board with some fancy cheese.


Hope you enjoyed this step by step tutorial. Please leave any questions or comments below.

