It's been a while since I've had a post. I thought I would share part of our Master Bathroom Remodel. I say master bathroom because it's attached to the master bedroom, but don't let that fool you...it's SMALL! Our decision to begin renovating this room didn't come by choice. We actually had some tiles fall off in the bathroom shower because it wasn't sealed properly. With significant water damage, the drywall just deteriorated causing the tiles to fall off. Don't judge us too harshly on the before pictures, some are pretty gnarly, but here's what we were working with.
What this photo will not tell you, is the shower door would hit the toilet when you open it. There is a wall that was built just to the right of the shower door. Behind that wall was a bench seat that was built out of tile making our shower basin pretty small, 32"x32".
This is as far as the shower door could open, you would have to turn and go in sideways to get into the shower.
I told you the pictures were gnarly. We found lots of rotting sheetrock under the tile.
Another thing that has always bothered me about this shower, was the globs and globs of caulking and grout in the corners and along the shower basin.
During destruction. Luckily some of the walls came out in whole sheets. On the back wall, I found more sheetrock (see the green piece of wall in the photo below) under the first layer of tile and sheetrock. To the right of the shower door was the bench seat and a tile wall, guess what was behind that tile wall?? Another tiled wall. The photo below also shows a gap between the shower basin and right wall, that's where the bench seat was located and took up about a foot of space.
This bathroom is small enough as it is, and there are way too many elements in it making it feel even smaller. The first step to rectifying that problem was to get rid of the small wall and bench seat.
We also decided to put in a new shower basin that we found online on
Amazon. The new shower basin is 32"x44", giving us about a foot more of shower space. We could have went a little longer, but because nothing is square in the bathroom, we thought we better not chance it and have it not fit.
Another thing we noticed when we were taking out the old shower basin and drywall was that the drywall was installed behind the shower basin flange. After doing some research, the flange to your shower basin is supposed to be anchored directly into the studs. This could have caused some of the water leakage that we were experiencing because it did not have a good seal.
Okay, time for some shopping. I went to Lowe's to just look around and see what my options were. Since this renovation was unexpected, and because of my thrifty nature, I wanted to do this as cost effective as possible. I looked into
tile board, which is super cost effective. Basically, all you do is use adhesive on the back, after cutting it to the correct size of your wall, and glue it to the wall. Then, you use this vinyl trim to complete the look.
That was until I saw some vinyl on sale. I've never used vinyl before. I used tile for my backsplash in the
kitchen. Apparently, they make vinyl you can now grout. Sounds pretty easy to me, and it looked pretty on the display at the store. I went ahead and got 6 boxes of this vinyl (30 per pack), it's peel and stick, which makes life even easier.
This vinyl came in 2 different colors, a black version and a white version. Brock liked the darker, so that's what we went with. What I wasn't thinking about when purchasing these, was the shape. I have never used anything that wasn't a square or rectangle shape. I have a feeling hexagon will be a bear to put on the wall (and have it look symmetrical).
Also, picked up some grout. Hoping 1 is enough, but I have my doubts.
I found this gem under the 2 layers of drywall, my family and I decided to leave our mark on the house too. We even made it a bit of a time capsule by putting a COVID-19 recommendation. Hopefully, that gets a good laugh in 10 years.
I went ahead and picked up a couple pieces of drywall. We already had 1 at the house. Make sure to use drywall with color so that you know they're mold resistant. I always remember these being green but all I could find were purple.
We removed the old subflooring and put in a new one that was 3/4" thick. Our basin required a mortar bed. My wonderful dad helped me with that part because I had no clue what I was doing. The basics to that though, is that the mortar bed acts sort of like a pillow. It's to keep your basin level. For example, before the mortar bed, when I was cutting the hole in the subfloor to accommodate the drain, the basin would teeter back and forth when I was walking on it. We made the mortar mixture pretty dry, we didn't even use half a bucket of mortar to make the bed. Looking back, we probably could have made the mortar mixture a bit more watery...we made it the constancy of wet sand.
After we got the shower basin on top of the mortar bed, we anchored it down temporarily (using large washers and screws) and allowed the mortar bed to sit for 24 hours.
After 24 hours, the shower basin was secured to the studs by drilling a hole in the flange of the basin and securing it with a screw. I made sure to do this on the sides of each corner. You can see on the right side of the basin (where the bench used to be) we had a gap. We used 2x4's and ripped them to fit to create a small wall.
Our bathroom was setup in such a way that we couldn't bring the whole piece of sheet rock in, so we had to cut a few inches off the bottom of each panel so we could fit it in there. The smaller panels were added later.
Finally! All the sheet rock is up and we are ready for mudding!
Side Note: We are only renovating the shower at this time. We plan to go back later and tear out the rest of the sheet rock, the flooring, vanity, sink, mirrored medicine cabinet and low hanging lights. To the left of the sink (not pictured) is a small closet that, at one time, had a door on it. It's nice to have shelving but it's another one of those items that takes up unnecessary space. The closet is set back about a foot from the wall (the wall that the sink and toilet are currently on). Our plan is, when we remove the closet, to move the toilet in there. Right now, you have about a 1.5-2' walking space between the toilet and the wall. I really think it would give it a much bigger feel and make navigating the bathroom much easier if it was set back where the closet currently is. I would also like to put in a longer vanity. With the room being really narrow, I don't want a vanity any bigger than 19" deep, but I think a 44" length would be perfect! Surely, something that long would have plenty of storage space so we won't miss our shelving that the closet provided.

After sanding the drywall, it was time for the vinyl to go up. I'll be honest, we wanted to quit...BAD! We started at the bottom, knowing that the dimensions of the wall were a little bit off from the bottom to the top. I did some awesome calculations that would leave me almost a half tile on either side of the back wall. What I didn't want is to have little slivers on the sides. So we put up the vinyl and began the next row...guess what? They had little slivers. We tried several different ways and no matter what we did, little cuts everywhere! After spending majority of the day scratching our heads, and ruining half a box of vinyl, we decided to pack it all up and return it to Lowe's.
Fast forward to 10pm that evening, I wanted to give it one more go. We decided to start in the middle (of the back wall) this time and just be happy with however it came out. Even if it wasn't perfect, it's still better than what we started with. We tried to use tile spacers, but the vinyl was so thin that they kept falling out. We ended up using a ruler as our vinyl spacer.
You can clearly see that some of the spacing was off. Again, due to the walls not being square, we had to give somewhere. I ended up using a miter saw to cut some of the smaller pieces. Larger pieces I used a box cutter to score the back, then snapped the vinyl.
Once they were all up, we began to have some vinyl fall off the wall. We went back to Lowe's and got vinyl adhesive and that was a game changer. After getting all the vinyl on, we began to grout.
We ended up with a small gap between the flooring and the shower basin. Again, we are updating this bathroom slowly and plan to replace the floor, so we needed a temporary fix. To fix this issue and save us some water issues, we put a couple pieces of trim on the shower basin followed by caulking it. We also caulked around the shower basin and the inside corners of the shower wall (better to be safe than sorry). We used clear silicone caulking for this.
According to the label, vinyl grout takes a whole 7 days to cure. So now we have a waiting game. I still need to attach the flange for the shower lever, and use a de-hazer after the grout is cured, but other than that..it's pretty much done.
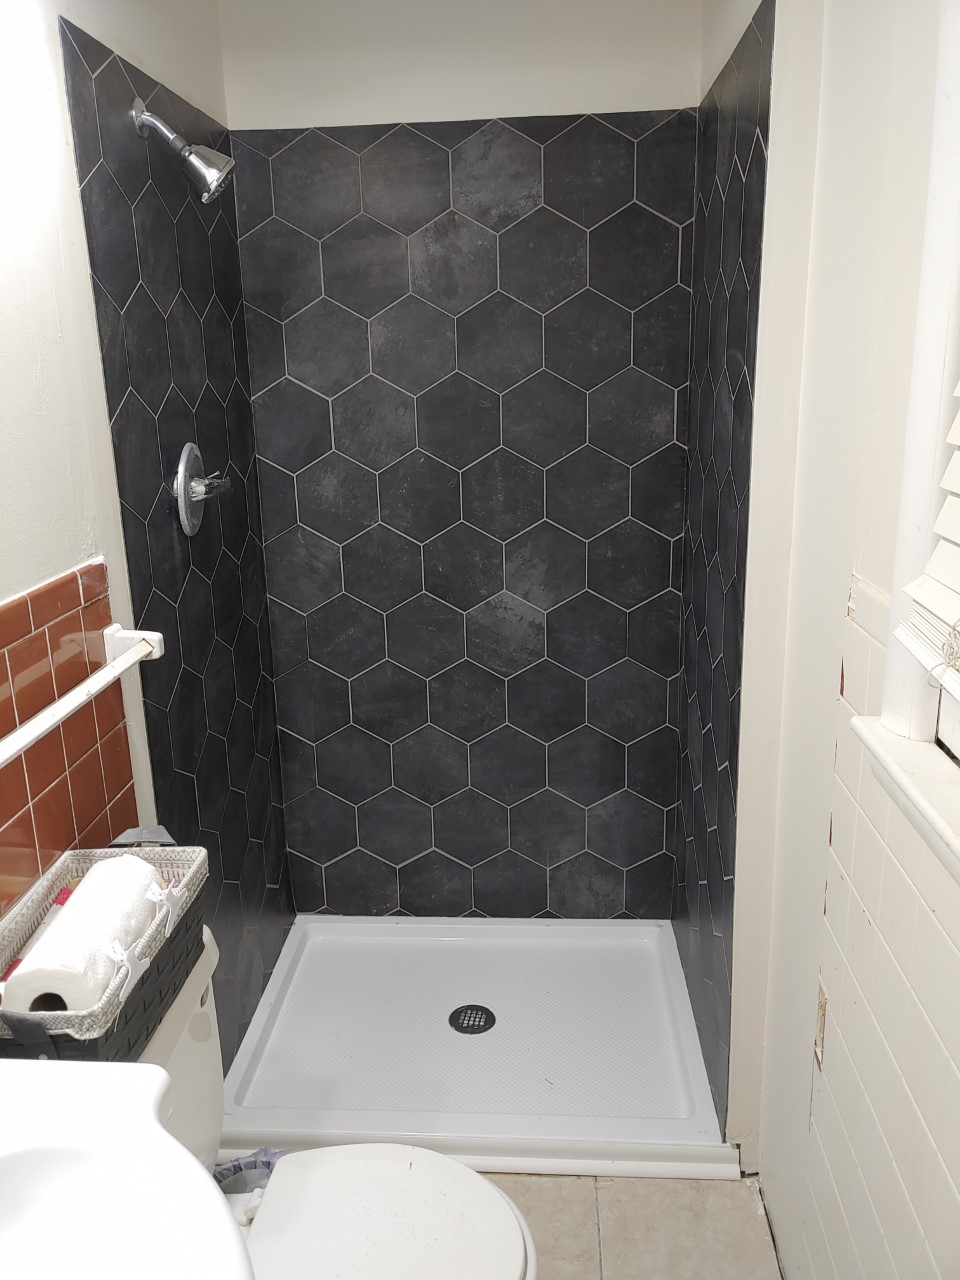
Update: I attached the flange for the shower level and used a grout dehazer. I installed some shelving and an shower curtain and rod. It's so nice to have our shower back!
Some before and afters:
Can't wait to do the rest of this bathroom!