For my son's room, I really wanted to add a bookshelf. I recently bought him a Biorb aquarium and also wanted the tank to be out of his reach also (he's only 2). All of his books are currently being stored on his dresser by bookends or aren't being used because they are on the closet shelf.
I bought a bookshelf off of Marketplace on Facebook. When I was picking it up, the bottom door fell off. So I had to wood glue that together.
I removed all of the shelves and doors. I also cut off the extra couple inches of wood on either side of the top of the bookcase, you can see them in the photographs below. It almost looks like it was put together wrong, it felt like an eye sore and I don't think that's how it was intended to look.
I wish I could tell you this was solid wood but it appears to be made out of particle board. I bought some peel and stick paper from Amazon. Now, obviously I should have waited to put this on the back, because I am wanting to paint the whole bookcase white with the same chalk paint I used to paint my son's dresser. However, when I went to go get the paint, it had dried out (probably didn't get the lid on quite right). I ordered the chalk paint but it's going to take a little bit to get to me and I couldn't waste a whole day and not do something to this project.
I will say, the peel and stick paper was ok to use. It did it's job but due to the design, this paper was almost impossible to match up. If I were to use peel and stick paper like this again, I would measure my project and by some the same width as my project or even bigger. If you are a perfectionist, you will hate this stuff, lol.
We also got his Biorb up and running, isn't it cool?!?! We are waiting on the tank to cycle so no fish in there yet. I got this Biorb off an auction site for $5! What a steal, right? It had a broken seal when I got it, but I used silicone and it seems to be holding water fine now. Waiting on one more decorative item to come in. I will be excited to get this bookshelf project done, it's so tempting for him to want to put his fingers in the tank. He had been telling the "pretty rocks" hi everyday.
I used Annie Sloan chalk paint on the dresser, the color is Old White.
When I've used Annie Sloan chalk paint in the past, I was super impressed with it. This time not so much. I ended up having to use 3 coats and ran out of paint. I'm not sure if something changed with the formula, but I'm not sure I'll be buying it again.
Fish tank time out....we got a few shrimp to put inside. I've never kept shrimp before but they are pretty cool to watch.
It's really fun to see when they are all active, here is 1 swimming around. We ended up buying 2 yellow, 2 red and 2 blue.
Still working on decorating it, but it's anchored to the wall and the fish tank has been moved.
The before and after photo.
Also installed this cool little light switch for Finn to use.
Not a whole lot to show on this project, but I decided to finally fix the railing I tore out. Funny story, I put a hall tree back in that storage area and I sold it. Well, when I went to get the hall tree out...apparently it wasn't as easy to get out as it was to put in there. So I had to rip out the wall partition that was there.
This was the only photo I could find of the original partition that I ripped out. This was back when I was purchasing the house.
So here is what it looks like now. I turned this room into a storage area. There's really no other use for it. You can see where the partition used to sit.
I decided to go with a wood railing, the reason was because I recently redid the handrail. It was previously painted white. Have you ever had a white hand rail in your house? Worst mistake I have ever made. I was recently stained in Minwax Early American.
For the railing I used metal conduit that I already had on hand. I spray painted them a black matte color.
Taking some measurements. I ended up by a 4x4 post and a 2x4.
If I were to do this project again, I would wait to paint the conduit until I cut them, because I ended up having to retouch all of them.
Staining all of the wood.
If you're starting to think this looks like a deck railing...I think so too. I did use a lot of elements you would see on a deck, like the post cap. I still think it looks better than it originally did though.
I used a 3/4" drill bit and drill 7 holes on each side (the post and the 2x4). I measured them all out at 4" apart. I read somewhere that 4" is the correct spacing, not sure if that's accurate or not. I tried to hide all of the screws as best I could. I also put a coat of polyurethane on the inside (where the 7 holes were drilled) because I knew it would be hard to do once everything was attached.
Projects are never as easy as everyone makes them look. If you have a house like mine, nothing ever goes according to plan. The problem I found when I went to install the railing was there was a big chunk of concrete at the bottom of the wall. The concrete set me back a day as I had to chip away at it with a rock hammer.
I used a hammer drill to pre-drill holes into the concrete floor so the railing could be a bit sturdier than the wall partition that was up there before.
After it was installed, I put 2 coats of polyurethane on it. Not perfect by any means, but I do think it looks a lot more put together than it did before.
I chose to go horizontal instead of vertical with the railing because I wanted it to be different than actual stair rails. I also didn't want it to look like a jail cell 😂.
Hope you enjoyed this post. I really enjoyed making this railing.
I just couldn't leave this hedgehog cage alone. The next thing we ended up doing was making a homemade wheel and took inspiration from this video. I will start off by saying, if I were to do a redo on this project, I would not have made a huge hole in the center, I would have left it a 5/16 hole instead. In the video I referenced earlier, he too made some notes on what he would have changed, so I took that advice and I got hex bolts instead of carriage bolts. Here are the supplies I ended up getting:
Fidget spinner, I already had this on hand but you can find them cheap on Amazon (to remove the middle portion of the fidget spinner, simply pry it out with a flat head screwdriver, if you can't do it by hand, this is where your 5/16 x 3" hex bolt will go)
I bought all of my nuts/bolts/washers at Sutherlands and spent about $5, since I already had the fidget spinner, this project ended up costing me $15.00. Now, in the video tutorial you will notice that his is on a stand made of PVC pipe. I really liked the looks of that because you could tell it was a homemade project, and that just seemed cool to me. We ended up forgoing the PVC pipe though and mounting it directly to the cage. To do this, all I had to do was measure where I wanted the wheel to end up and drill a 5/16" hole on the back of the cage.
Now Teddy has all sorts of room in his 2 story condo. I was worried that Teddy wouldn't like it, because the wash basin I bought has a slight taper to it. Rest assured though, he loves it and was on it all night. We had a silent spinner before, which isn't exactly silent but I will say it was more quiet than our homemade wheel. Still I like the looks of it and it's so much easier to clean since it's all one smooth surface. All in all, I would rather pay $15-$20 for our homemade version than the $40 store version. This was so easy to do, if you are even thinking about trying it for yourself...you should!
It looks a little shaky here with my son spinning it, but it looks a lot more stable with Teddy on it. We will try to update a video of him on the wheel soon!
More detailed video:
**Sorry for the confusion, in the video I say 5/8, I mean 5/16**
Some recent pictures of Teddy. We tried to get him to love his dig bin by adding treats in there....he is still not a fan.
I've always had a love for animals, I recently started a new hobby with an aquarium. I've had plenty of aquariums in the past but I wanted something for my office. There has definitely been a learning curve when it came to this particular aquarium. The new part of it is plants.
Here is Jaws, the great white.
So, I have a betta in the tank. We have had 2 bettas in the past at home. Scout and Benton both had betta fish that lived for a few years. They had each of them in a 1 gallon tank with a filter. What I've learned since then, is that betta's actually prefer warmer water, around 78-80 degrees. I also discovered that a 1 gallon tank, although larger than the cups they're kept in at fish stores, is too small.
I'm going to share my fish tank journey.
I started out thinking an aquaponic tank would be cool. I got this one on Amazon. It started out with an anthurium on the top of the tank. It would help if I would have researched a bit because anthurium's need full sunlight.
So of course the plant began looking sad, so I repotted it and stuck it by a window. The plant began growing new leaves and loved it's new potted home. Then I tried lucky bamboo. Well, it turned out Jaws didn't care for the big stems being in his home. So the bamboo got put in a vase.
You can see in the above picture that I have a small plant planted in the rocks. This plant is called an anubias and as it turns out, it isn't supposed to be planted. I have since tied it onto a piece of wood with some thread so it's roots are exposed to the water.
In this photo you can see 2 new plants, these are called java ferns. They were also planted originally but then I found out, these too should not be planted in substrate. You really don't have to anchor these plants to anything and they will free float near the bottom of the tank, they really don't move around too much. I would catch Jaws resting on the java ferns in the smaller tank (but I haven't seen him do it in the larger tank yet).
The more I looked at the aquaponic tank, the more I realized...with the sponge filter, the heater, and a couple of java ferns, the poor fish really had no room to swim. Plus, the tank began looking dirty with the natural rocks on the bottom. I think I was really looking for an excuse to upgrade the tank to a 5 gallon, since the aquaponic tank was only 1.4 gallons.
Since this new 5 gallon tank is plastic, it shows his reflection. I never had a problem with Jaws seeing himself in the other tank, but when I moved him into this one he would flare all of the time. He did it so often that it appeared he was truly scared. I ended up buying some frosted window cling on Amazon and put it on the back and the sides of the tank. That resolved the flaring issue and he doesn't do it anymore.
I ordered a bunch of aquatic plants from Modern Aquarium...turns out, too many. After putting them all in there, and realizing I was back to the original problem....not enough room to swim, I decided to take about half of them out and give them to a friend.
Here are the plants I purchased from Modern Aquarium:
Update after taking half of the plants out. I have to say I was honestly surprised with how many plants came from Modern Aquarium. I ended up being 5 different plant species, 3 background plants,
Now my problem is keeping the plants in the substrate. I chose black sand, not only for it's eye appeal but also to try and make the tank look as clean as possible. The issue is, the stemmed background plants don't want to stay in the sand. I need to come up with a way to either weigh them down (fishing weights) or perhaps glue them to rocks or getting a different substrate.
The other thing I needed to mention is the fish health that I've learned about. So Jaws decided to do a thing called fin nipping. Sounds like there are various reasons for why they nip their own fins, I've read it could be because their tail is too heavy, they are stressed or even out of boredom. I've slowed the filter down, thinking this could have been stressing him. I added lots of hiding places with the new plants and a rock hide (which he never uses). The water is always at 78 degrees. I put the frosted glass up so he wouldn't flare anymore. I added an Indian Almond leaf to use the tannins to perhaps heal his tail. I'm thinking I may end up getting Kanaplex and seeing if that makes a difference.
Here are some photos of Jaws' fins...poor guy.
Here's a tank update, after rearranging some plants.
Well, I did end up moving Jaws to a hospital tank. It has a sponge filter, a heater and a thermostat. A betta hammock, a pink hide and an Indian almond leaf were also added to the hospital tank. I added the KanaPlex as per the directions. I decided to move him to the hospital tank after noticing 2 pinpoint sized holes in his dorsal fin.
I'm going to follow the instructions and try to do 3 doses of the treatment before returning him to his normal tank. Wish us good luck. He's been there a day so far and he appears to be really active (per usual).
He has since been moved back into his permanent tank. He still has signs of fin nipping. Overall still a really happy guy though.
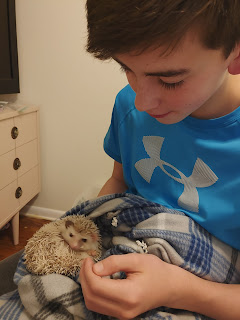
It's been a while since we've had a good project. My son was dying to have an "exotic pet". We made him research quite a bit prior to allowing our new spiky friend to come home. He thought he wanted a bearded dragon, then it was a guinea pig....after those were ruled out for various reasons, he got down to 2. A chameleon or an hedgehog. Well, the hedgehog won out, meet Theodore, Teddy for short.
Before we get started on the build, here are some interesting facts we learned about hedgehogs:
Their quills make them float in water
They are nocturnal and run up to 12 miles a night
They need bonding time with their owner
Their habitat needs to be around 75-85 degrees Fahrenheit
They are perhaps the cutest creatures
You may recognize this piece of furniture from a prior restoration. We still use this to hold a tv, but don't have anything inside the drawers. We figured we could spend $100 on a really tiny cage or use that money to renovate this dresser. We drew up the plans, originally we wanted to keep the 2 upper drawers to store supplies, but we quickly realized there wouldn't be enough space for 2 levels and his 12" wheel.
Here is what we started with...
We took all the drawers out and gutted the inside.
We cut out new flooring (for the upper level and lower level) out of 3/4" plywood that we already had in the garage. The top level had an extra cut because we wanted to make a ramp that led down to the lower floor. Originally we wanted 2 openings, 1 for a ramp and the other for tubing....but again, the size of this dresser didn't allow us enough room to do both.
He purchased linoleum at the Home Depot. This was an important step because we wanted something that would be easy to clean and prevent the hedgehogs potty and poo poo's from seeping into the wood. Here he is tracing out the flooring. We used an adhesive for the vinyl (that we had from a previous project) to attach it to the wood.
We used some wood scraps I had from a prior project to frame out the dresser. Unfortunately, this dresser isn't square, so the cuts differ from piece to piece. You can see the new additions, as they are not stained. We secured all the flooring and new framing with screws.
We had more wood scraps that we used for the doors. We made them a "picture frame" style and cut out plexiglass that we got at Home Depot. We ended up getting 2 sheets of this.
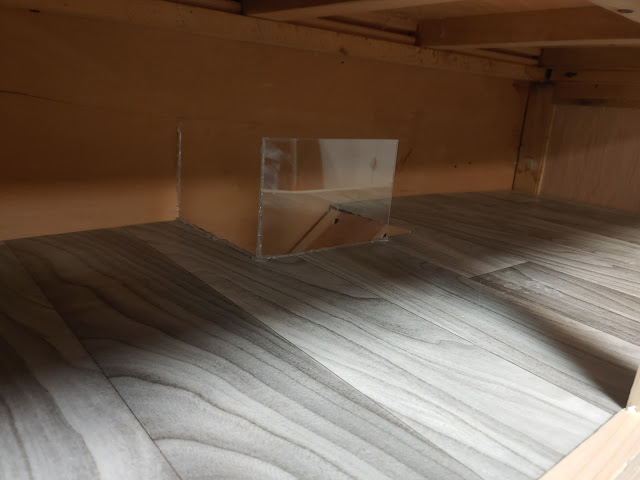
With some of the left over pieces of plexiglass, we hot glued them on to the opening for the ramp. We left 1 side open so Teddy can actually go down the ramp. These were added for safety reasons, so Teddy wouldn't fall into a hole and hurt himself.
We also installed the ramp, which looked to be a little steeper than I originally planned. We ended up buying this really cool tape from Amazon so Teddy could have traction when he climbs up and down the ramp. It feels a lot like sandpaper.
Then, he began staining all of the new wood.
I thought this video would be fun for him to look back on. Hard work pays off.
Now we are in a waiting game. We are letting the fumes air out and everything gets time to dry.
Teddy was kept in a temporary cage in a different part of the house so he wasn't around the fumes. My son told me that hedgehogs don't like a lot of extra space....I'm not sure I believe that. I think he's going to love his 2 story home.
Something special we learned about hedgehogs is, they need light during the day (so we got a couple of push lights, 1 for each level) so they know when to sleep. Then you get to have bonding time for a little bit prior to turning their lights off for the night. When the lights go out, these little creatures run a marathon on their wheels.
Ok back on topic, the heater is simply that. It looks like a heat lamp (the kind with a light inside) but it's called a ceramic heat emitter and it actually produces zero light, it's sole purpose is to create heat. We found a 2 pack on Amazon.
Teddy in his new home.
The boys enjoying their hard work.
A message from Benton, don't mind the cute little monster that interrupts the video. He's sweet and really loves Teddy.
UPDATE: After Teddy went inside his new home, we realized there are a few fixes we need to make. We have to make the heat lamps a little safer and block off the area so Teddy can't get back to the lamp. He hasn't done it yet but I would hate for him to get burned, those ceramic heat emitters get REALLY hot! We also are going to make a longer ramp so it's not as steep for Teddy to get up and down. You can't see it in the pictures, but we ended up adding the bedding inside the home so it was cozier for Teddy.
So we are waiting on new lamps, thermostats and looking for some sort of screen. We'll update again soon.
Update:
Another update (we laughed so hard because of the Night at the Roxbury reference):
Recent photos:
Last order of business is cutting strips of fleece to go in his igloo so he can burrow in it, but other than that we are officially done. I'm happy to say the ceramic heat emitters (CHE) are working great! I'm so glad we went to a lower wattage. We started out with 150 watts and went down to 75 watts. The 75 watt bulb is smaller than the 150 in size which worked out nicely too. I'll take a photo of the size comparison soon. I've read everywhere the recommended wattage for CHE is 100-150, well the 150 was beginning to burn the linoleum on the upper floor. I think due to the dimensions of our enclosure and that it has doors (instead of an open top), that it keeps the heat in nicely. Don't worry about Teddy, he can breathe just fine. There's space between the doors and the frame and there are holes cut out of the back of the enclosure for cords.
Teddy is still sleeping in the back right corner of the enclosure instead of in his hut or his new dome hut (with the stars on it). We didn't witness him playing in his ball pit yet either. I think it will just take him time to adjust. I think he's a big fan of the fleece flooring though, I'm really happy we aren't using paper bedding anymore. It was really messy. I think my son will really enjoy his hedgehog now that he doesn't have to vacuum every time he gets him out of his enclosure.
Hope you enjoyed this project. I had the best time building this with my son.
As you can see in the video, we made some great updates. We installed some under the cabinet lights on each levels ceiling. The lights are now plugged into a timer so Teddy has some consistency about when the lights come on and when they turn off for the night. Lights were necessary for us to install because my son's room is always very dark unless he has his room lights on and it would be difficult for Teddy to tell day from night. Did you know that hedgehogs need both a heat source and day/night time or they could go into hibernation? We learned that hibernation can be lethal, so this is very important to keep an eye on everything working properly.
I even titled this video, hedgehog final update.... but it probably won't be the last update. The next thing we are going to work on for Teddy is a homemade wheel that's built in to the cage (instead of a wheel on a stand). To view the homemade wheel project, click here.
I'm not sure if it's helpful but I wanted to put links for everything down in one spot. Clearly, you can see throughout this post we changed multiple things, so I wanted to share the items we ended up using.
Cage Build Supplies:
3/4" plywood (1 for top level, 1 for the bottom)
1x2 boards (already hand on hand in various lengths, I would guess we used approximately (4) 12' long boards....that could be an overshot but it's my best guess. This was used for the framing of the cage and the picture frame styled doors)