Boards I replaced
If you are in the market for Missouri real estate be sure to check out Harmon Homes
Sunday, August 9, 2015
Master Bedroom - Refinishing hardwood floors
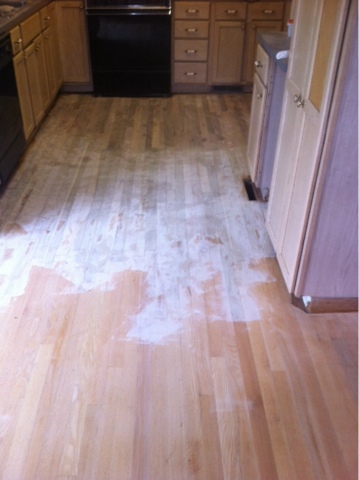
Here's where I began trying sanding for the first time, 3 different grits of sand paper for each tool (drum sander and edger....didn't care for edging, it's a back and leg breaker). Also, replaced a couple boards in my room because they dipped really bad and also the previous owners tried to fill them with something...looked like wood glue to me.
Friday, August 7, 2015
Kitchen and Dining Area - Refinishing hardwood floors
The dining area I didn't have to do much to. It was painted a gray color so I just repainted that with the same colors as the living room (I used the same colors throughout the house) and also painted the trim.
The kitchen on the other hand still needs some work. From what was once the most updated appearing room in the house, it's now trailing behind the others. It had tile layed down on it, some was grouted, others were broken because they weren't grouted. Regardless, all of that got ripped out and was replaced with oak flooring that was used and tore out of an older home.
I got all this used oak flooring from a friend and teacher from my home town. Man, it's good to have friends. What a difference this made.
I should have gotten some up close pictures of the tile, so you'll have to imagine what was described above. Trust me when I say, it needed to come out!
You can see where the hardwood ended and where the tile once was began. I had to cut out some of the hardwood to make it appear like it had always been there and get rid of the threshold line.
And we rented this handy nail gun for wood flooring...really big huh? Actually it was pretty fun and easy to use.
And the beginnings of installing the used hardwood. First place that got done was underneath where the dishwasher sets.
Finally all the kitchen flooring has been layed down
This last picture was taken before I finished the last of the kitchen flooring. Took a while to get them fit in there all snug. Will update more once they've been sanded and refinished!
And one final picture before it gets sanded.
Wanted to share an update on the kitchen now that it's been stained and has a coat of polyurethane on it (still needs another coat). Happy to report that the home made wood filler stained pretty good. I know it's not perfect, but I am super happy with how it turned out.
The dining room after being stained
The kitchen on the other hand still needs some work. From what was once the most updated appearing room in the house, it's now trailing behind the others. It had tile layed down on it, some was grouted, others were broken because they weren't grouted. Regardless, all of that got ripped out and was replaced with oak flooring that was used and tore out of an older home.
I got all this used oak flooring from a friend and teacher from my home town. Man, it's good to have friends. What a difference this made.
I should have gotten some up close pictures of the tile, so you'll have to imagine what was described above. Trust me when I say, it needed to come out!
You can see where the hardwood ended and where the tile once was began. I had to cut out some of the hardwood to make it appear like it had always been there and get rid of the threshold line.
And we rented this handy nail gun for wood flooring...really big huh? Actually it was pretty fun and easy to use.
And the beginnings of installing the used hardwood. First place that got done was underneath where the dishwasher sets.
Finally all the kitchen flooring has been layed down
This last picture was taken before I finished the last of the kitchen flooring. Took a while to get them fit in there all snug. Will update more once they've been sanded and refinished!
And one final picture before it gets sanded.
I'll have to admit, I'm a bit nervous to stain the kitchen floor. I made my own wood filler for the first time using sawdust from sanding the floors, spackling and water. The gaps look better but still doesn't calm my nerves...
Here's a picture after using the drum sander with a 24 grit sand paper
And here we are after applying my home made wood filler
A closer shot of my concoction
And more sanding which everyone knows is my favorite thing to do in the world...(insert sarcastic eye roll here)
Wanted to share an update on the kitchen now that it's been stained and has a coat of polyurethane on it (still needs another coat). Happy to report that the home made wood filler stained pretty good. I know it's not perfect, but I am super happy with how it turned out.
The dining room after being stained
Front door - Faux Staining
So the front door I was excited about because it was a birthday present and we were told it was solid wood. Well, it is solid wood...underneath the veneer. I have been having some tough luck with veneer lately. Anyway, I did some research and found an idea on Pinterest on how to do faux staining. The original post I got this idea from was Lovely Crafty Home, who painted the door followed by using a gel stain. I had never heard of gel stain before, to be honest it reminded me of pudding. But here was my experience with it.
Here was the original door to the house.
And this was my new door, what a great birthday gift!
I got the recommended paint from the blog post which was Glazed Pecan by Behr, I bought it at home depot along with the gel stain from Minwax and a few other odds and ends I thought I may need.
I painted two coats of glazed pecan on each side of the door. Like the other blogger, I also had to suffer through a couple weeks of the outside of the door being orange. Needless to say it turned some heads...and not in the way you would want.
I did one coat of gel stain on one side of the door prior to the new door jam and door being hung. Wouldn't you know it, my luck I ended up staining the inside of the door instead of the outside by accident, that's what resulted in my neighbors gawking for a bit.
Now on the label it said to let the stain dry for at least 8 hours, must have been the humidity at the time because it took over two weeks to dry.
I finally got to do the outside stain to the door which took a few days to dry.
After it dried I did what was recommended on the post and used a UV polyurethane on the door. Note about UV polyurethane: When I opened the container I was extremely surprised that it was a grayish-brown color. It went on just fine though, so don't be scared when you see that!
We also put new trim in by the door which I used regular stain on versus gel stain. This picture was in the middle of staining, I also followed this up with a coat of UV polyurethane.
Looks much better I think.
I also got a snapshot of the inside of the door after it was polyurethaned.
I'll update more once the floors have been refinished, followed by moving in my furniture!
Utility Room
All this house needed as a TON of tlc. The utility room was one of the scariest, again because it's in the basement it too suffered from the flood coming from the backyard.
I gave her a good scrubbing! Certainly smells a lot better in there. And she got a pretty new door! Again, good to have friends :)
There was new sheetrock also put in this room and painted. Someday I'll be taking that partial tiling off the wall. Not sure if the former owners used this as a practice wall before doing the bathroom tiling or what, but it needs to come down.
Where would I be without friends?? Not having the washer and dryer where I want it....
I had a friend help me move my electrical outlet for my dryer over by the original washer hookups (and he attached the water lines to the wall so they weren't roaming free anymore). Still need to make sure the drain works okay before doing laundry. He also moved the lint catcher thing and put conduit around the electrical wire (which was missing before)...looks mighty professional eh? He also helped me knock off some of that crazy tile!
The Basement
I know I mentioned before there was a leak problem. The basement used to have carpet and I have plans to get the paint of the concrete floor and stain it, I don't want any carpet in the house.
Here's what we walked in to.
I know lucky me right? Two fireplaces in the house, I hate that they painted over the brick and mark my words, someday I will get that off. After clearing out all the things they left behind, we ripped out the carpet and most of the walls due to water damage.
This all got new sheetrock that sits an inch of the ground now. It was repainted and will eventually someday have trim.
Mud Room
There's a room in the house right after you come into the house from the garage door that I saw no purpose for. Plans are to transform this into a mudroom. It's a future project so for now, this just got new sheetrock and painted too,
Hallway - Refinishing hardwood floors
The hallway was another project that could have taken way too long. Again, the paint started peeling in sheet and then just stopped coming off. There were probably 4 layers of wallpaper I encountered after taking off this molding that was on the wall that separated the living room from the hallway. I'm not sure why it was on there to be honest. The hallway also had a hole in the wall that needed to be patched up.
I didn't take as many pictures through here and probably should have.
The stairs used to have carpet on them that we tore out. Underneath the carpet the steps were painted white and had these flower decals on the side. So I sanded all that down and those will be restained when the rest of the hardwood flooring is refinished.
Sanded the hallway and it's all ready for stain.
After being stained
Subscribe to:
Posts (Atom)